


What’s the biggest difference between the PGA and LPGA professionals you see on TV and the weekend warrior amateur golfer? It isn’t the 300+ yard drives or their ability to hit iron shots close. Casual golfers lose strokes on the green. They 3 and 4 putt multiple times per round, while the advanced player typically has 1 putt or 2 putts on most greens. This makes a big difference on their scorecard.
At the end of the day, putting and fitness are what the professionals have figured out. Amateur golfers don’t do the appropriate exercises for golf and don’t spend enough time practicing their short game. We definitely recommend you spend more time getting in “golf shape,” but we are going to focus this article on helping you make more putts!
What Are Putting Drills?
What’s the difference between a putting tip and a putting drill? A putting tip is something simple for you to try. For example, make sure your golf ball is clean before you putt. Did you know that even 1 grain of sand on your ball can make your putt swerve offline? Always bring your favorite golf towel to the green and clean your ball before you putt. Another example of a putting tip is “keep your head still.” Great feedback, but you still need to properly execute.
A putting drill is giving you a way to practice. It’s a process to follow that’ll help you improve your stroke and your ability to control the ball on the green. To put it a different way, the right putting drills will teach you how to make more putts.
Why is it important to use putting drills? Poor practice habits will not give you the results you want. Just smacking putts on the practice green will not make you a better putter. You need focused putting drills that will improve the mechanics of your stroke and help you build confidence on the greens. We can help! We provide detailed instructions below on how to perform our favorite 6 putting drills. Give them a try and become the boss of the moss!
Putting Drills You Need To Try
For each putting drill below, we provide you instructions, explain why it’ll help, and provide you with some ideas to spice it up if you find the drill boring. Good luck!
Pull Back Putting Drill
- Find a fairly flat 10-foot putt on the practice green
- Try to make the putt – if you do, consider it a birdie
- If you miss, pull the ball back to one full putter length from the hole (this will be approximately 3 feet)
- If you make this putt, consider it a par
- If you miss, pull it back to the 3-footer again
- Continue this process until you make the 3 foot putt, adding a stroke each time you miss
- Play 9 holes and track your score – how many over par did you score?
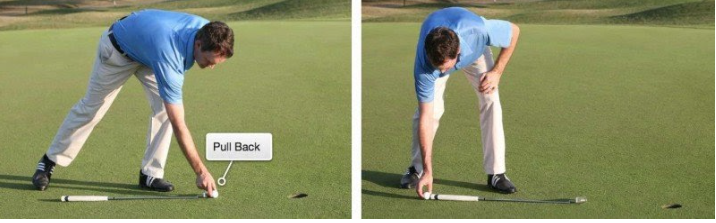
How does this help your putting? First, it allows you to practice trying to make a “birdie” from 10-feet, but the real key to shooting a good score in this putting drill is making the 3-foot putts. You can save a bunch of strokes on the course if you always make your 3 foot testers.
Spice It Up
There are several ways you can add more excitement to the Pull Back Putting drill. Keep a “course record” for the 10-foot putt – how many under par can you shoot? Try more challenging first putts – add breaks or try it from longer distances.
2. Around The World Putting Drill
- Pick a relatively flat hole on the putting green and make an even circle around the hole with 10 golf tees. Each tee should be ~4 feet from the hole.
- The goal is to work your way around the circle and make all 10 putts in a row – if you miss a putt, start over.
- Sounds simple, but is very challenging.
.
How does the Around the World Putting Drill help your putting? Confidence is critical on the greens and when performing this putting drill you will see a lot of putts go in the hole. By completing the full circle, you’ll get 10 putts with slightly different breaks.
Spice It Up
If you master the 4-foot circle, try 5 or 6 feet. It is very hard to make 10 putts in a row from any length. Select a hole with a significant break – this will test your ability to make putts that require you to aim at the edge or even outside of the cup.
3. One-Handed Putting Drill
This one sounds and feels strange, but it works! Simply hit some putts by holding your putter with one-hand. Use your right hand if you play right-handed. Place your left hand on your left hip.
How does this help your putting? This is the perfect putting drill to help you feel the putter during your stroke. The putter should slightly open and close during your stroke – if done correctly, the putter releases through the ball at the exact moment of contact. Putting one-handed allows you to feel this release better. It may feel awkward, but imagine how easy putting will be once you go back to using both hands!
Spice It Up
Challenge one of your buddies to a one-handed putting contest. You’ll have plenty of opportunities to laugh at each other when you first start using this putting drill.
4. Gate Putting Drill
The Gate Putting Drill was made famous by Tiger Woods. Has anyone made more clutch putts than Tiger?
- To set up the drill, you’ll need four tees. The first two tees should be placed 6 feet from the hole and they should be just wider than the width of your putter head.
- Place your golf ball between these two tees.
- Set up the other two tees about three feet from the hole. The gap between these tees should be slightly wider than the golf ball.
- Now that you have set everything up, you try to hit the ball by swinging your putter through the first set of tees and the ball should roll through the second set of tees before finding the bottom of the hole.
- You might have to adjust the 2nd set of tees to ensure you have the break of the putt read correctly.
How does the Gate Putting Drill help your stroke? Both sets of tees play a critical role in this drill. If your putter hits the first set of tees while you are making your stroke then the arc of your stroke is either too far outside or inside. If the ball hits the 2nd set of tees, you’re either pulling or pushing the ball. When you roll the ball through the gate and into the hole you know you have hit a perfect putt!
Spice It Up
Is this drill too easy for you? Challenge yourself by adding a 3rd set of tees for the ball to roll through. You can also try it on a longer putt.
5.1-2-3 Putting Drill
- Go to the practice green with 3 golf balls and your putter.
- Place the balls on the same line, but from 3 different distances (we recommend you start with 3’, 6’, and 9’).
- Starting from the closest ball, make all 3 putts.
- If you miss one, start back over at the 3 foot putt.
How does this improve your putting? The 1-2-3 Putting Drill will help you develop a consistent stroke and improve your confidence as you watch putts roll into the hole.

Design A Practice Routine That Works For You
Most amateur golfers spend all of their practice time hitting balls on the driving range and ignore their short game. Don’t make this mistake. We recommend the 50/50 rule. If you practice for two hours every week, spend at least half of that time on your short game.
Use your putting practice time wisely. You don’t have to complete all 6 of the drills above, but find the 2-3 that you enjoy and work well for you. It if helps, come up with a practice plan before you arrive at the course. For example, plan to putt one-handed for 10 minutes to get the feel, complete the Around the World putting drill from 5-feet, and finish with the 1-2-3 putting drill from 5’, 10’ and 15’. You can complete it in under 30 minutes and leave the green a better putter.
The main thing is to enjoy the game. Good luck and roll in some birdie putts!